Hey guys, kali ini gue bkal posting tentang cara partisi SD Card di android, dan khususnya Galaxy Mini. Yang dimaksud partisi disini adalah untuk membuat memory untuk link beberapa aplikasi, lib, dan dalvix-nya biar ngga di internal storage. Kalo boleh saran sih, buat cusrom kaya CM mnding pke ext4, ya walaupun gue disini share.nya pake ext2 karena umumnya yang laen share kya gtu.
Penting!!! Wajib dilakukan! Backup (copy) dulu semua isi SD Card Anda ke hardisk komputer Anda.
.
Step by step cara partisi SD card adalah:
2. Install software tersebut.
3. Cabut / lepaskan SD Card dari smartphone Galaxy Mini, lalu masukkan SD card ke Memory Card Reader, setelah itu tancapkan Memory Card Reader ke komputer.  (kalo belum punya Memory Card Reader, beli dulu ya – cuma 8rb kok)
4. Buka software MiniTool Partition Wizard Home Edition.
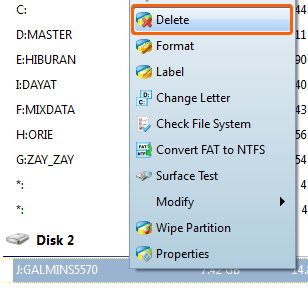
5. Cari nama SD Card Anda, biasanya di Disk 2. Punya saya GALMINS5570, kapasitasnya 7.42GB (8GB). Kalo SD card punya Anda kapasitasnya 2GB, cari aja yang disitu tertera 1.8GB atau berapa yang jelas dibawah 2GB. Kenapa ukuran di software tersebut tidak tercatat sesuai aslinya? misal 8GB harusnya kan tertera 8GB. Silahkan gugling sendiriya guys.
6.  Kalo sudah ketemu, klik kanan nama drive SD card Anda >> Delete.
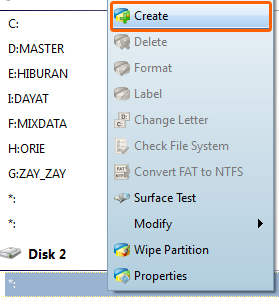
7. Klik kanan lagi >> Create
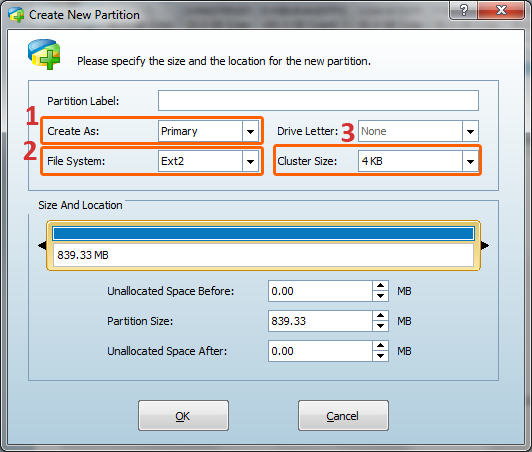
8. Setting seperti pada gambar berikut, lalu klik tombol OK.
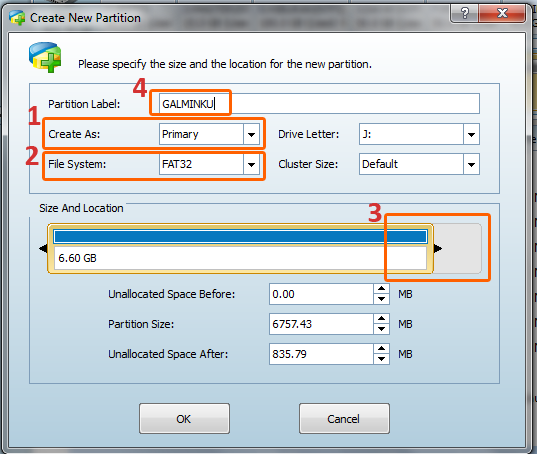
Untuk nomor 3, Silahkan ubah sesuaikan sendiri. Pada gambar tersebut Unallocated Space After: 835.79 MB artinya nantinya memori internal smartphone akan bertambah menjadi 835.79 MB + 180 MB (bawaan).
Khusus yang mempartisi SD card dengan kapasitas 2GB:
Nomor 1: Primary
Nomor 2: FAT
Nomor 3: Silahkan Unallocated Space After nya dibuat kisaran 300MB s/d 500MB
Nomor 4: Silahkan namai sesuai keinginan Anda.
9. Yap.. Partisi pertama sudah jadi. Sekarang klik kanan drive yang tanda *: dibawah drive Partisi pertama yang Anda buat tadi >> pilih dan klik Create
Muncul gambar berikut:
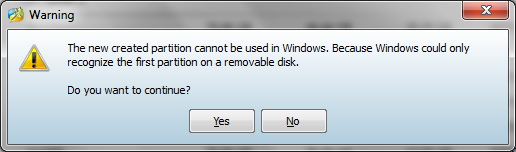
Pilih Yes.
10. Atur / setting sesuai gambar berikut, lalu klik tombol OK.
11. Cek Operations Pending yang berada di panel sebelah kiri, akan tampak seperti ini:
operations pending partition
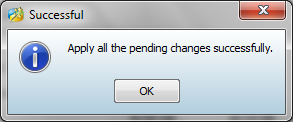
Lalu klik tombol Apply.
Muncul gambar seperti ini,
Pilih Yes.
12. Tunggu prosesnya sampai selesai, seperti pada gambar di bawah ini.
Klik OK, dan SD card Anda sekarang sudah memiliki 2 buah Partisi! Terakhir close programMiniTool Partition Wizard Home Edition lalu copy kembali semua isi SD card yang tadi telah di backup.
LANGKAH SELANJUTNYA
1. Install Link2SD
2. Kalo memang partisinya berhasil, ntar waktu buka Link2SD-nya minta create partisi, trus agan pilih sesuai partisi yang udah agan buat. (misal ext2, ext4, dsb)
3. trus reboot HH.
4. Masuk lagi Link2SD,kalo udah ngga minta pembentukan partisi, berarti partisi yang agan buat berhasil.

GOODLUCK. DWYOR
Rom apa yang paling stabil : STOCK ROM
Rom apa yang paling smooth : ROM yang dikasih lotion + pelembab
Rom apa yang paling awet batrenya : ROM yang error, abis booting langsung mati sendiri.
Rom apa yang jadi rebutan : ROMlah tukang bubur jadi developer
Rom apa yang paling hemat pulsa : Rom yang isi apk nya cuma SMS sama telepon
Rom apa yang bisa instal sendiri : Rom ghaib, link tersedia di forum supranatural
Rom apa yang mantep : ROM yang didevelop chuck norris.
Rom apa yang ada disaat bulan puasa : ROMadhon.
bulan romadhon telah berkahir kami meminta  maaf bila ada salah2 kata
Mohon dibukakan pintu maaf yangselebar2nya ya teman2.


Gak perlu seperti i-phone yang harus beli untuk install aplikasi..
Gak perlu seperti Blackberry yang harus punya BBM biar bisa eksis..
Gak perlu seperti Windows phone yang harus pake vendor asli..
Karena maaf itu..
Se-simple Android yang Open Source dan terbuka untuk semua orang..
Mari kita root hati kita yang terdalam, partisi semua "dosa" untuk me-wipe "kesalahan" dan "kekhilafan".. 
Lalu install "Maaf.apk" dan reboot semua masa lalu menuju Firmware Hati yang baru..

Mohon maaf lahir & bathin

Ketika sebuah widget meninggalkan luka yang teramat greget...
Ketika sebuah wallpaper menorehkan caci ke hati sumber...
Ketika sebuah home screen menyisakan luka dalam bathin...
Ketika icon tak mampu tuk mengucap kata syukron...
Hanya maaf yg mampu meleburkan semua khilaf & dosa.
Minal aidzin wall faidzin
Mohon maaf lahir & bathin 

Hey guys. kali ini gue mau kasih trik buat para pemilik android yang punya RAM sempit (kaya punya gue) hehe.
sebenarnya sih males gue buat post ini, soalnya udah pasti banyak yang bahas tentang RAM Manager yang satu ini. yaaa cuma buat mengisi kekosongan aja laaah
Oke ini dia SS aplikasinya


saran gue sih loe set aja balance, lock launcher in memory (cek), set on boot (cek), VM dibuat 64, trus swap pilih 256. kalo di GalMin gue sih lancar

oke langsung aja DOWNLOAD
Hay guys, lama ga post.
GPL, langsung aj gwe share tntang "tweak a
ndroid yang gwe kumpulin dari XDA, ini udah test di galMini ane, makin sip aja,


Nah letak tweak yg mau kita include ini ada di "/system/build.prop"
Buat jag
a-jaga, sebaiknya kita backup dlu Original build.prop nya yaaa.


Contoh:
# Save battery
wifi.supplicant_scan_interval=180
pm.sleep_mode=1
ro.ril.disable.power.collapse=0

keterangan:
1. # (adalah hastag dari setiap nama script)
2. Save battery (hemat battery, adalah nama script untuk menghemat battery)
3. wifi.supplicant_scan_interval=180
    pm.sleep_mode=1
    ro.ril.disable.power.collapse=0 (Fungsi script agar battery menjadi hemat)


kode script tweaks: 

# Raise JPG quality to 100%
ro.media.enc.jpeg.quality=100

# VM Heapsize; 178MB RAM = 32 is better
dalvik.vm.heapsize=32m

# Render UI with GPU
debug.sf.hw=1

# Decrease dialing out delay
ro.telephony.call_ring.delay=0

# Helps scrolling responsiveness
windowsmgr.max_events_per_sec=150

# Save battery
wifi.supplicant_scan_interval=180
pm.sleep_mode=1
ro.ril.disable.power.collapse=0

# Disable debugging notify icon on statusbar
persist.adb.notify=0

# Increase overall touch responsiveness
debug.performance.tuning=1
video.accelerate.hw=1

# Photo and video recording quality tweak (2.3 Rom only)
ro.media.dec.jpeg.memcap=8000000
ro.media.enc.hprof.vid.bps=800000

# Photo and video recording quality tweak (Official ROM only)
ro.media.dec.jpeg.memcap=10000000
ro.media.enc.hprof.vid.bps=1600000

#Signal (3G) tweaks
ro.ril.hsxpa=2
ro.ril.gprsclass=10
ro.ril.hep=1
ro.ril.enable.dtm=1
ro.ril.hsdpa.category=10
ro.ril.enable.a53=1
ro.ril.enable.3g.prefix=1
ro.ril.htcmaskw1.bitmask=4294967295
ro.ril.htcmaskw1=14449 ro.ril.hsupa.category=5

# Internet tweaks
ro.ril.hsxpa=2
ro.ril.gprsclass=12
ro.ril.hep=1
ro.ril.hsdpa.category=10
ro.ril.enable.3g.prefix=1
ro.ril.htcmaskw1.bitmask=4294967295
ro.ril.htcmaskw1=14449
ro.ril.hsupa.category=6
ro.ril.def.agps.mode=2
ro.ril.def.agps.feature=1
ro.ril.enable.sdr=1
ro.ril.enable.gea3=1
ro.ril.enable.fd.plmn.prefix=23402,23410,23411
ro.ril.enable.a52=1
ro.ril.enable.a53=1
ro.ril.enable.dtm=1

# NetSpeed tweaks
net.tcp.buffersize.default=4096,87380,256960,4096,16384,256960
net.tcp.buffersize.wifi=4096,87380,256960,4096,16384,256960
net.tcp.buffersize.umts=4096,87380,256960,4096,16384,256960
net.tcp.buffersize.gprs=4096,87380,256960,4096,16384,256960 net.tcp.buffersize.edge=4096,87380,256960,4096,16384,256960

# Disable blackscreen issue after a call
ro.lge.proximity.delay=25 mot.proximity.delay=25

# Fix some application issues
ro.kernel.android.checkjni=0

# Phone will not wake up from hitting the volume rocker
ro.config.hwfeature_wakeupkey=0

# Force button lights on when screen is on
ro.mot.buttonlight.timeout=0

# Disable boot animation for faster boot
debug.sf.nobootanimation=1

# Enable Stagefright helps stream Video and Music Faster
media.stagefright.enable-player=true
media.stagefright.enable-meta=true
media.stagefright.enable-scan=true
media.stagefright.enable-http=true

# Enable display Dithering
persist.sys.use_dithering=1

# Enable purgeable assets
persist.sys.purgeable_assets=1

# For SD storage insert notification sound
persist.service.mount.playsnd=0

#Force launcher into memory
ro.HOME_APP_ADJ=1

Balance Tweaks

# IPV4 tweaks
echo "0" > /proc/sys/net/ipv4/tcp_timestamps
echo "1" > /proc/sys/net/ipv4/tcp_tw_reuse
echo "1" > /proc/sys/net/ipv4/tcp_sack
echo "1" > /proc/sys/net/ipv4/tcp_tw_recycle
echo "1" > /proc/sys/net/ipv4/tcp_window_scaling
echo "5" > /proc/sys/net/ipv4/tcp_keepalive_probes
echo "30" > /proc/sys/net/ipv4/tcp_keepalive_intvl
echo "30" > /proc/sys/net/ipv4/tcp_fin_timeout
echo "404480" > /proc/sys/net/core/wmem_max
echo "404480" > /proc/sys/net/core/rmem_max
echo "256960" > /proc/sys/net/core/rmem_default
echo "256960" > /proc/sys/net/core/wmem_default
echo "4096,16384,404480" > /proc/sys/net/ipv4/tcp_wmem
echo "4096,87380,404480" > /proc/sys/net/ipv4/tcp_rmem

# Dalvik VM tweaks
echo "4096" > /proc/sys/vm/min_free_kbytes
echo "0" > /proc/sys/vm/oom_kill_allocating_task
echo "0" > /proc/sys/vm/panic_on_oom
echo "0" > /proc/sys/vm/laptop_mode
echo "0" > /proc/sys/vm/swappiness
echo "50" > /proc/sys/vm/vfs_cache_pressure
echo "90" > /proc/sys/vm/dirty_ratio
echo "70" > /proc/sys/vm/dirty_background_ratio

# Battery tweaks
echo "500" > /proc/sys/vm/dirty_expire_centisecs
echo "1000" > /proc/sys/vm/dirty_writeback_centisecs

# Sdcard Speed tweaks
echo "2048" > /sys/devices/virtual/bdi/179:0/read_ahead_kb(Class 4 and above)
echo "512" > /sys/devices/virtual/bdi/179:0/read_ahead_kb (Class 3 and lower)

Aggressive Tweaks

# IPV4 tweaks
echo "0" > /proc/sys/net/ipv4/tcp_timestamps
echo "1" > /proc/sys/net/ipv4/tcp_tw_reuse
echo "1" > /proc/sys/net/ipv4/tcp_sack
echo "1" > /proc/sys/net/ipv4/tcp_tw_recycle
echo "1" > /proc/sys/net/ipv4/tcp_window_scaling
echo "5" > /proc/sys/net/ipv4/tcp_keepalive_probes
echo "30" > /proc/sys/net/ipv4/tcp_keepalive_intvl
echo "30" > /proc/sys/net/ipv4/tcp_fin_timeout
echo "404480" > /proc/sys/net/core/wmem_max
echo "404480" > /proc/sys/net/core/rmem_max
echo "256960" > /proc/sys/net/core/rmem_default
echo "256960" > /proc/sys/net/core/wmem_default
echo "4096,16384,404480" > /proc/sys/net/ipv4/tcp_wmem
echo "4096,87380,404480" > /proc/sys/net/ipv4/tcp_rmem

# Dalvik VM tweaks
echo "4096" > /proc/sys/vm/min_free_kbytes
echo "0" > /proc/sys/vm/oom_kill_allocating_task
echo "0" > /proc/sys/vm/panic_on_oom
echo "0" > /proc/sys/vm/laptop_mode
echo "0" > /proc/sys/vm/swappiness
echo "20" > /proc/sys/vm/vfs_cache_pressure
echo "95" > /proc/sys/vm/dirty_ratio
echo "60" > /proc/sys/vm/dirty_background_ratio
# Sdcard Speed tweaks
echo "2048" > /sys/devices/virtual/bdi/179:0/read_ahead_kb(Class 4 and above)
echo "512" > /sys/devices/virtual/bdi/179:0/read_ahead_kb (Class 3 and lower)

Dan ingat DWYOR yahhh

official thread: XDA Developer
Hey Brad. lama ngga post nih.
nih langsung aj post buat si mini. ga ada problem ato bugs satupun
ditambah swap 128, makin mantap kaya galaxy s-3

ss
  
  
CHANGE LOG - V5
  • Based on latest nightly 27/01
  • themed removed
  • themed quick toggle icons
  • themed dialer png's
  • statusbar clock changed to white
  • in-call dialer png's changed
  • call end button changed
  • settings background changed
  • adrenaline engine continued
  • Galaxy S3 rosemary fonts
  • battery themed
  • notification drawer panel themed
  • quick toggle swap button themed
  • power menu icons themed
  • contacts preview picture themed
  • statusbar icons themed
  • green overscroll animation like real touchwiz nature
  • notification toggle improvements
  • navbar dimensions changed
  • option tickers changed
  • data graph background in settings fixed
  • loading icons changed
  • new S3 dandellion default wallpaper
  • stable and smooth
  • great battery life


EASY TUTORIAL TO FLASH CUSTOM ROM WITH ADDITIONAL PACKAGE - 
Disclaimer Do It At Your Own Risk!
  1. Copy the downloaded files to the (Root directory of) your sd-card.
  2. Reboot your device to Custom Revovery (1.CWM Recovery 2. RZ Recovery ).
  3. [Optional] Do a Nandroid Backup Of Your Current ROM.
  4. Now from recovery main menu and select Wipe Data option.
  5. Confirm data wipe by selecting Yes.
  6. How To flash Custom Rom & Google Apps using Custom Recovery ?
  7. Follow Below Step-
  8. Now Go Back & Select Wipe cache.
  9. Then wipe dalvik cache.
  10. Reboot and enjoy! 
maaf lama gag posting disini saya akan berbagi Cyanogen Mod buat galaxy mini/pop. langsung aj ya...

Cyanogenmod 9 ( stable – 27/10/2012 ) for Galaxy Mini/Pop GT-S5570

It has been about a month since an update to the CM9 version of our galaxy mini is given and now its finally out.Mind you there were CM9.1 releases and CM10 releases but Cm9 has come back almost completely stable and fully working.There are a few major changes in the camera quality that was really needed.So, here is the changelog ,screenshots that are provided above and flashing instructions!
Changelog
> CyanogenMod 9 ( stable – 27/10/2012 ~ 7pm GMT+3 )
* Fixed data graph background (with a little “hack”, thanks to ic92 for pointing out where the problem is)
* Fixed network location (no other modifications required)
* Fixed issue that Google location services prevented device from entering deep sleep
* New camera HAL based on Wayland’s and arco’s work ( thanks!  )
* Fixed camera settings (like exposure, effects)
* Camera is more colorful now
* Updated file manager
Installation Process
Disclaimer : Do It At Your Own Risk!
  1. Download required files and updates from below :
  1. Copy the downloaded files to the (Root directory of) your sd-card.
  2. Reboot your device to Custom Revovery (Press Home + Power Button).
  3. [Optional but, Recommended] Do a Nandroid Backup of your current ROM.
  4. Now from recovery main menu and select Wipe Data option.
  5. Confirm data wipe by selecting Yes.
  6. Now flash this ICS based rom using clockwork mod recovery. Follow these steps :
    • Choose Install Zip From Sd Card option.
    • Select Choose Zip From SD Card option.
    • Now select cm-9-20121027-UNOFFICIAL-tass.zip downloaded earlier.
    • Confirm the installation and wait till the rom is installed on you handset.
  7. Flash Latest Google apps for ICS in CWM recovery.
    • Choose Install Zip From Sd Card option.
  8. Select Choose Zip From SD Card and the nightly is installed on you handset.
  9. Reboot and enjoy!
Watch this awesome video of latest CM9 being run on galaxy mini

CyanogenMod 10 (nightly – 20/10/2012) for Galaxy Mini/Pop GT-S5570

Jellybean on our mini is really nearing perfection now and the last couple of builds really do suggest it.This one does not have any major changes but are there any left really?So, here is the changelog, screenies and the flashing instructions.
> CyanogenMod 10 ( nightly – 14/10/2012 ~ 4pm GMT+3 )Previous nightly
* Fixed data graph background (with a little “hack”, thanks to ic92 for pointing out where the problem is)
* Fixed network location (no other modifications required)
* Fixed issue that Google location services prevented device from entering deep sleep
* Improved CRT animation performance
* Fixed calendar and weather layouts on lock screen (thanks to mr.faridcom)
> CyanogenMod 10 ( nightly – 20/10/2012 ~ 4pm GMT+3 )latest
* Improved UI performance (some additions in kernel)
* Improved battery usage data accuracy
* Removed some things to save some space on /system (system size: ~153MB)
 Installation Process
Disclaimer : Do It At Your Own Risk!
  1. Download required files and updates from below :
  • Unofficial   CyanogenMod 10 nightly  from here.
  • Latest Google apps for JellyBean.
  1. Copy the downloaded files to the (Root directory of) your sd-card.
  2. Reboot your device to Custom Revovery (Press Home + Power Button).
  3. [Optional but, Recommended] Do a Nandroid Backup of your current ROM.
  4. Now from recovery main menu and select Wipe Data option.
  5. Confirm data wipe by selecting Yes.
  6. Now flash this android 4.1.1 jellybean based cyanogenmod 10 rom using clockwork mod recovery. Follow these steps :
    • Choose Install Zip From Sd Card option.
    • Select Choose Zip From SD Card option.
    • Now select ROM downloaded earlier.
    • Confirm the installation and wait till the rom is installed on you handset.
  7. Flash Latest Google apps  for JB in CWM recovery.This one has working Google Now and voice search!
    • Choose Install Zip From Sd Card option.
  8. Select Choose Zip From SD Card and the nightly is installed on you handset.
  9. Reboot and enjoy!


untuk yang lainnya anda bisa kunjungi techgeekal.wordpress.com - www.techgeekal.com - jellaxy.com
thank.
salam ANDROIDZER
Copyright © 2013 Pandu Galaxy Mini.